Tuesday, October 2, 2012

Home School Science Lab: Ocean Currents

(Done using the K12 curriculum for 5th Grade)

The movement of deep-water currents depends on how salty the water is, its temperature, and it's density.

Surface currents are mainly caused by wind, which is a result of the rotation of the Earth.

This activity will demonstrate both types of currents.


Materials:
baking dish - clear, deep (mine is round, but rectangle would have worked better)
drinking glass
drinking straw
food coloring
graduated cylinder - 100 mL
salt
spoon
very warm water
very cold water


Deep Water Currents
 
 1. Measure 97 mL of very cold water in the graduated cylinder. 


2. Add salt to the water in the cylinder until the water reaches 100 mL.


3. Pour the mixture into a glass.


Observe the salty water.  Compare it to freshwater.  Notice that it is denser than freshwater because it is so salty.  Add blue food coloring to the glass of salty water and set it aside.


4. Pour 2 L of very warm water into a clear baking dish.


5. Add 60 mL of salt and stir until the salt is dissolved.


7. Let the water sit until it is still.


Think about how deep-water currents form in the ocean.  Cold, salty water near the North Pole is very dense.  It sinks, and then flows toward the equator where it is heated.  Then it rises, because it is less dense, and flows back toward the North Pole as more cold water moves in.


When your water is still, slowly pour the cold salt water into the pan.  Observe what happens to the cold, dense water.


You should see the cold salt water sink and move across the bottom of the pan, creating a current.


Surface Currents
 
Blow gently through a straw across the surface of the pan of water.


Observe the ripples that occur from your "wind."  These are surface currents.
:)


For more information regarding cyber schooling your children from home and the K12 curriculum, please visit k12.com.

Monday, October 1, 2012

Creepy Crafts for Hair-Raising Halloween Party Perfection


  I've got 3 incredibly freakin' difficult Halloween crafts that are sure to disgust your candy-munchin' ghosts, goblins, pirates, princesses, vampires & werewolves!  By disgust, I mean delight and by incredibly freakin' difficult, I mean HELLA EASY!  Boo-ya! (Pun intended)

  So, let's get this show on the road, ladies.  Halloween ain't gonna wait around forever!


Peter Piper Picked A Pumpkin Cup

Starting with the easiest of the easy, I'll show ya what I did to make the Pumpkin Cups!


1. Buy some Mandarin Orange fruit cups and grab yourself a Sharpie.


2. Use your Sharpie and draw a Jack O' Lantern face right on those bad boys.


3. DONE!

Moving on...


Granny's Ghastly Goblin Garland

Not particularly difficult, but slightly more time consuming.


1. Gather up the following items:
- 4 different styles of fabric, 1 yard each. (This will make A LOT of garland.  I made one 18' strand and three 10' strands with supplies to spare using this amount.)
- Spool of hemp
- Scissors
- Pencil (for marking the fabric to cut)
- Yardstick


2. Cut fabric into 1.5" x 6" strips.

3. Cut hemp to desired length of garland.


4. Tie the fabric strips around the hemp.  I left a little space between each one.  The closer you tie them to each other, the fuller your garland will be.


5. Keep going till you run out of string, Einstein.
6. Use the garland to tie up your children and use them as scary Halloween decor in your front yard.


And last but not least...

Paranormal Party Potion


1. Here's what you'll need:
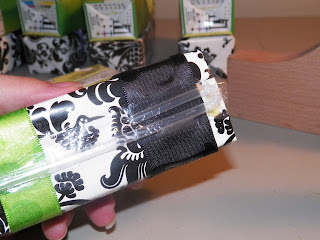
- Juice Boxes (the dimensions of mine were 4.75" x 2" x 1.5")
- Spooky (Or pretty, whatever) Gift Wrap
- Various styles & colors of ribbon.
- Scotch Tape
- Bottle of school glue
- Assorted Halloween die cut card stock. (I found these at Michael's, but if you have a Cricut, you're ahead of the game!)
- Yard stick
- and Scissors (Not pictured.  Dummy me.)


2. Easily the most tedious step of them all: Remove the straws from the backs of the juice boxes WITHOUT RIPPING OPEN THE PROTECTIVE PLASTIC SLEEVE!  I may or may not have cursed under my breath while completing this step.

3.  Cut the gift wrap into 6" x 7.25" rectangles.  (These dimensions were perfect for the size of my juice boxes.  If your boxes are a different size, adjust accordingly)

4.  Cut ribbon into 7" strips. (Ditto from above)


5.  Wrap box in gift wrap, but don't cover the top end.  Fasten with Scotch Tape.


6. Wrap ribbon around the box and fasten in back using a combination of school glue & scotch tape.


7. Glue the Halloween die cut shapes onto the front of the box and allow to set.


8.  Attach the straw to the back of the box using a small piece of scotch tape.


Good job there, kiddo!  Now, no one will go thirsty.


  So, there you have it.  Hopefully you're sufficiently inspired enough to throw your kids one heck of a Halloween hoedown... or at least have some cool ideas to contribute to someone else's spooktacular shindig.  I'll post some additional shots below so feel free to check them out.

Until next time, HAPPY HALLOWEEN!!!

                                              _
                              /\              )\
                _           __)_)__        .'`--`'.
                )\_      .-'._'-'_.'-.    /  ^  ^  \
             .'`---`'. .'.' /o\'/o\ '.'.  \ \/\/\/ /
            /  <> <>  \ : ._:  0  :_. : \  '------'       _J_
            |    A    |:   \\/\_/\//   : |     _/)_    .'`---`'.
            \  <\_/>  / :  :\/\_/\/:  : /   .'`----`'./.'b   d  \
           _?_._`"`_.'`'-:__:__:__:__:-'   /.'<\   /> \:   0    |
        .'`---`'.``  _/(              /\   |:,___A___,|' V===V  /
       /.'a . a  \.'`---`'.        __(_(__ \' \_____/ /'._____.'
       |:  ___   /.'/\ /\  \    .-'._'-'_.'-:.______.' _?_
       \'  \_/   |:   ^    |  .'.' (o\'/o) '.'.     .'`"""`'.
        '._____.'\' 'vvv'  / / :_/_:  A  :_\_: \   /   ^.^   \
                  '.__.__.' | :   \'=...='/   : |  \  `===`  /
                             \ :  :'.___.':  : /    `-------`
                              '-:__:__:__:__:-'